I had a ton of fun chatting with so many friendly people at the Post Falls High School Craft Fair on Saturday! And was especially impressed to see how many Stampin' Up! demonstrators dropped by! I think by day's end there had been about 7 or 8 demonstrators who'd popped in and introduced themselves; now, if only I was good with faces and names to remember 'em all for *next* time, lol!
And the morning crowd was amazing; I remember looking up at one point and seeing the (quite wide) aisle completely filled with people in both directions. This was obviously not only a craft fair, but the day's social meeting point as well! 🙂
If you've attended one of my booth events over the years you know that I'm not one to just hang and wait for someone to show up. But rather, I generally keep myself busy stamping some kind of little give-away goodies. This year and last I chose gift tags for that item, and this year I particularly wanted something I could crank out quickly and not have to clean stamps along the way. So what's my favorite "quick stamp" technique? Something monochromatic! Not only can a single color of ink be a real wow, but it holds down supply costs and there's zero chance of sticking the stamp into the wrong ink pad! (Something that's always embarrassing to do in front of an audience.) I knew my working space would be limited, so the simpler, the better, I figured.
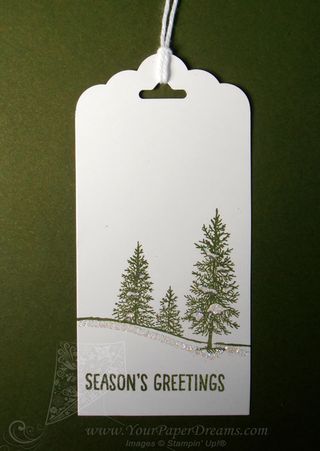
So here's the simple, monochromatic design I made and gave away 60-some 
of in 6 hours. (Actually, more like 4-1/2 hours, because the last hour and a half of the 6-hour show was basically dead.)
This tag began as a 2" x 4" piece of Whisper White cardstock. I chose Mossy Meadow for the ink color, and then there were just a few simple steps…..
- I chomped off one end with the Scalloped Tag Topper punch.
- The snowy trees image (from "Happy Scenes" stamp set) was placed about 1/3 of the way up from the bottom. (Remember that when using photopolymer stamps, I always recommend placing a piercing mat underneath to compensate for the lack of foam layer on the stamp itself.)
- "Season's Greetings" image (from the same set) was placed in the lower area, closer to the left edge for weight balance.
- I applied 2-way glue pen in the areas to be glittered….
- Then dunked into Dazzling Diamonds glitter and shook off excess.
- Finally, I folded a 12" length of Whisper White Bakers Twine in half, brought the two ends together through the tag hole from back to front and looped through the fold for the tag ties.
IF I'd been able to find a "To / From" stamp I'd have either positioned that in the upper left-hand corner or on the back, but after searching in vain through my entire collection of current stamps I sadly concluded I must have sold or retired any such stamps that I once owned. Shoot. There are 3 such pairs of stamps in the current Holiday Catalog, and at least that many in the Annual Catalog, but doggone if I could find 'em when I was tearing through my stuff searching for 'em, lol! Oh well, we'll just call that "white space" – an important element of design, too.
Product List
AND DON'T MISS THIS WEEK'S "WEEKLY DEALS" – available until discounted supplies are exhausted, or thru Monday, Nov. 16, whichever occurs first:


