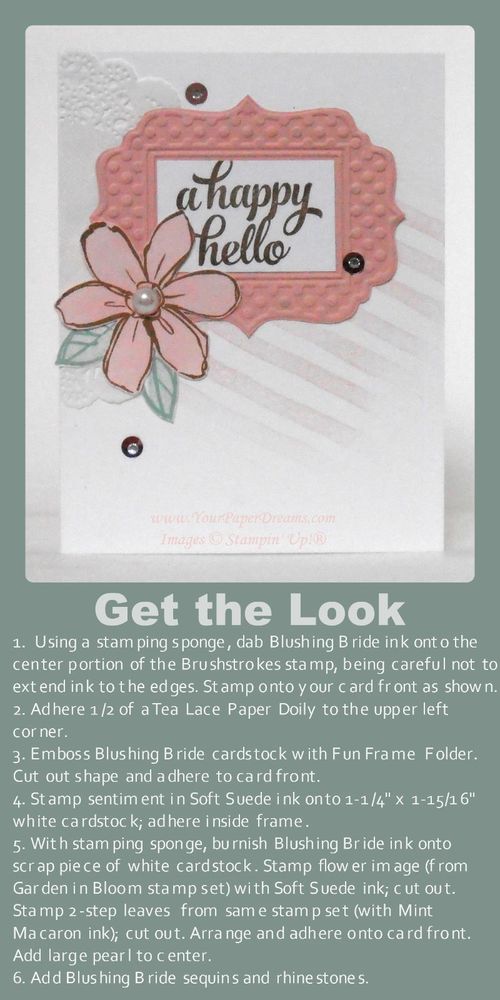
One of today's trendy looks is creating a focal point from a grouping of individual elements. Often, the sentiment is included as one of those grouped elements, and there may also be subtle texture or other visual interest in the background. This card features all of those.
Those who've been following me for a while know that some of my favorite techniques involve applying ink in non-traditional ways. This card features two such examples.
The diagonal lines of the background represent the first such technique. To get that look, I inked a stamping sponge (just by pouncing it on the Blushing Bride pad), and then dabbed it onto the center portion of the Brushstrokes stamp. I was careful to avoid extending the ink as far as any of the edges of the stamp, as that would give a harsh edge when stamped. Rather, what I was looking for here was a softer, more cloudy look, where the inked image just kind of fades in and out. Once the ink was applied, I stamped the background at that jaunty angle for yet more visual interest.
Another favorite way I like to use ink a little "out of the box" is when I want a piece of colored cardstock that's more subtle than the intense colors of our regular cardstocks. In this case I wanted a Blushing Bride flower, but a much softer shade of it than the Fun Frame it would be backed with. So I just burnished Blushing Bride ink onto a scrap piece of Whisper White cardstock with a stamping sponge before stamping the flower image onto it. (My version of "burnish" is to rub ink down into the cardstock in a circular motion. I actually do try to rub the ink right into the cardstock, so I start with a light hand and then get firmer and firmer as I rub in circles. Every time I reload the sponge from the ink pad I am careful to tap my sponge off once or twice onto my scratch paper so I don't accidentally get a "blob" of ink when I first touch the paper I'm working on. You can always add more ink, but can't take it away if you get a "blob", ya know.) So once I decided I had the color intensity I wanted for this, I just stamped the flower image (from Garden in Bloom) right onto my newly-colored paper and then fussy-cut it with Paper Snips.
The leaves are stamped in the more usual 2-step method this stamp set was designed for….. and then also fussy-cut.
When I first introduced this card at card class last month several of the ladies groaned at the assumption they'd have to cut out the center section of the embossed Fun Frame. But no worries there; it's just it's own layer of Whisper White cardstock (1-1/4" x 1-15/16") – stamped and applied on top of the frame! Easy-peasy!
Even though none of these elements is popped up on Stampin' Dimensionals I still wanted to retain a suggestion of depth anyway. So I only applied adhesive to the center areas of the frame, doily and flower, leaving their outer edges free.
Oh! And a tip for applying the sequins: place a tiny dot of Fine-tip Glue where you want the sequin to be, then lay the sequin right over it. Remember – that's a "TINY!" dot, in order to avoid a glue smear!
Don't you think this same general layout would be fun to work up into a Christmas card? I'd love to see your examples if you do that!
Product List


